.svg)

Statsig is a feature flagging, experimentation, and product analytics platform built for product and engineering teams that want to ship faster and learn from every release. Getting started correctly with the right SDK, clean event tracking, and properly configured experiments -- is what separates teams that get reliable results from teams that spend months debugging data they cannot trust. This guide covers the core concepts, the setup sequence, and what you need to have in place before you run your first experiment.
Most teams that struggle with Statsig do not have a tool problem, but a setup problem.
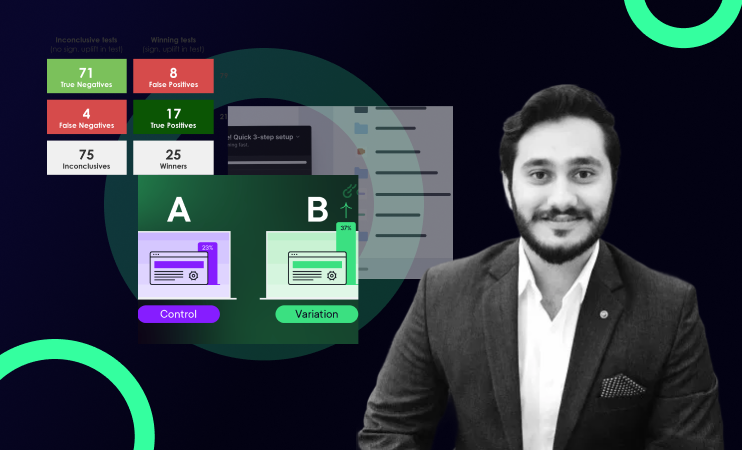
Statsig is genuinely powerful when configured correctly. Feature flags that let you roll out to 1% of users and expand gradually. Experiments with sequential testing and CUPED variance reduction built in. Product analytics that connects directly to your experiment results. A single platform that replaces three separate tools.
But all of that power depends on a foundation, with the right SDK for your use case, clean event taxonomy, correct API key configuration, and identity resolution that actually works. Get the foundation wrong and every experiment that runs on top of it produces data you cannot trust.
Here is the setup sequence that gets it right from day one.
What Statsig Actually Is
Before getting into setup, it helps to understand what Statsig does and how it differs from tools you may already be using.
Statsig is three things in one platform. A feature management layer that lets you control who sees what in your product through feature flags and gradual rollouts. An experimentation layer that lets you run A/B tests with statistical rigour: sequential testing, CUPED variance reduction, holdout groups, and guardrail metrics are all available out of the box. And a product analytics layer that connects experiment results to user behaviour data without requiring a separate analytics tool.
The combination is what makes Statsig particularly powerful for product teams. You flag a feature, roll it out gradually, run an experiment to measure its impact, and analyse the results, all in one platform, with all the data connected.
What Statsig is and how it works with Amplitude covers the full platform overview and how it fits into a modern product analytics stack.

Step 1: Choose the Right SDK
This is the most important decision in the setup process and the one most teams get wrong.
Statsig offers three categories of SDK: client-side SDKs for browser and mobile applications, server-side SDKs for backend services, and edge SDKs for CDN-level evaluation. Each is designed for a specific context and produces fundamentally different behaviour.
Client-side SDKs evaluate feature gates and experiments on the user's device, the flag evaluation happens in the browser or mobile app. This is the right choice for front-end feature changes and UI experiments where the assignment logic does not involve sensitive business data.
Server-side SDKs evaluate on the server before responding to the client. This is the right choice for experiments that involve backend logic, require assignment before the page renders (to avoid flicker), or involve data that should not be exposed to the client.
The wrong SDK choice does not always produce obvious errors. It produces subtle problems, like inconsistent assignment across sessions, exposure events firing at the wrong point in the user journey, or feature flags that behave differently on mobile than web. Choosing correctly at the start prevents weeks of debugging later.

Step 2: Configure Your Environments and API Keys
Statsig uses separate API keys for different environments like development, staging, and production. Each environment should have its own key and events logged in development should never mix with production data.
This step is consistently where teams create their most expensive data quality problems. Using the same API key across environments contaminates production data with internal traffic, test events, and QA sessions. The contamination is invisible in the Statsig dashboard until someone notices that experiment results do not match reality, by which point significant time has been lost.
Set up separate environments before you instrument a single event. Create the keys in your Statsig console, configure your deployment pipeline to use the correct key for each environment, and validate that events from your development environment are not appearing in your production data stream.
Step 3: Instrument Your Events
Statsig uses event data to evaluate experiment metrics. The quality of your event tracking determines the quality of your experiment results, and this is where most teams invest the least thought upfront.
Two things matter most for event instrumentation.
Consistent naming conventions. Events named differently across platforms like add_to_cart on web and AddToCart on mobile are treated as separate events by Statsig. Any experiment metric that depends on aggregating these events will be incomplete. Establish a naming convention before you instrument anything and enforce it across all platforms and teams.
Correct property structure. Events without properties are significantly less useful for experiment analysis. Define which properties each key event needs to carry: user ID, session context, relevant business attributes -- and ensure they are always present and correctly typed. An event that sometimes passes a null user ID will produce fragmented user journeys in your experiment data.
The most common Statsig setup issues almost always trace back to event naming inconsistencies and missing properties, both of which are far easier to fix before data accumulates than after.
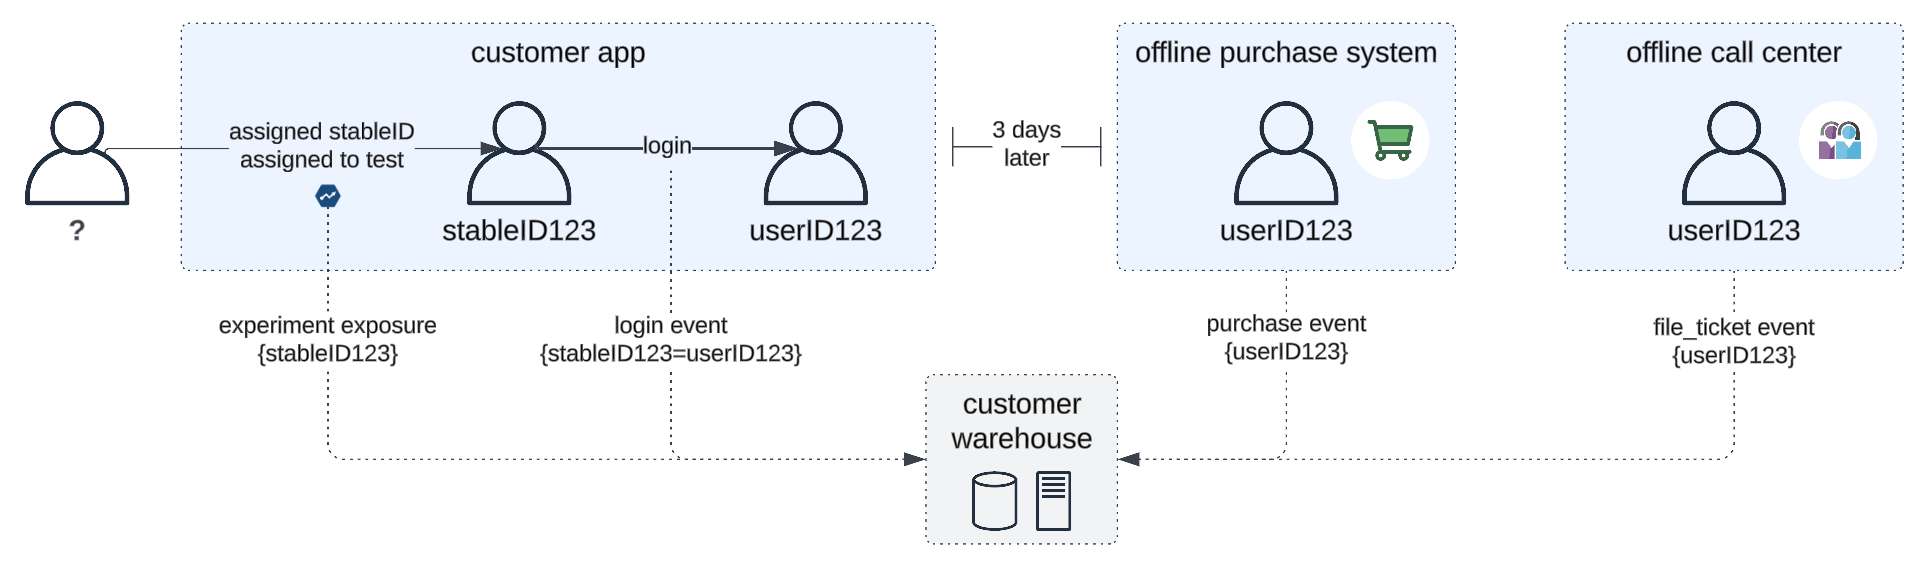
Step 4: Configure User Identity
Identity resolution is the most critical and most commonly misconfigured aspect of any Statsig setup.
Statsig uses two identifiers: a stable device ID for anonymous users and a user ID for identified users. The transition from anonymous to identified is when a user signs up or logs in, is where most identity problems occur.
For Statsig to correctly merge the anonymous session with the identified user profile, the logEvent call that identifies the user must fire at exactly the right moment with a stable, permanent user ID. An email address that could change is not a reliable user ID. A session token that resets is not a reliable user ID. An internal database ID that is consistent across platforms and sessions is the right choice.
Misconfigured identity resolution creates duplicate user profiles like inflating your user count, breaking user-level experiment assignment, and making any analysis that depends on seeing the full user journey from first visit to conversion unreliable.
Step 5: Set Up Your First Feature Flag
With SDK, environments, events, and identity configured correctly, you are ready to create your first feature flag.
In the Statsig console, navigate to Features and click Add Feature. Give the flag a descriptive key, something that clearly identifies what it controls, following a consistent naming convention. Set the default value to FALSE. You do not want the feature to turn on until you explicitly enable it for an experiment or rollout.
Configure the environments: enable the flag in your staging environment first for testing, then production when you are ready to launch. Share the feature flag key with your engineering team so they can implement the gate check in the codebase.
The gate check is a simple conditional: if Statsig returns TRUE for this user, show the feature. If FALSE, show the existing experience. Your developer implements this at the point in the code where the feature is rendered or the decision is made.
Step 6: Set Up Your First Experiment
Once the feature flag is in place and your event tracking is instrumented, you are ready to set up an experiment.
In the Statsig console, navigate to Experiments and click Create New Experiment. Add a descriptive name, a documented hypothesis, and a tracking key. Configure your traffic split, start with a 1/99 split for initial validation before moving to 50/50. Add your primary metric and at least two guardrail metrics. Set your targeting rules if the experiment should only reach a specific user segment.
Before launching, run the pre-launch checklist. Is the feature flag enabled in the correct environment? Are exposure events firing correctly? Does the sample size calculation suggest sufficient traffic to reach significance within your desired timeframe?
Enable sequential testing before you launch, not after. Sequential testing allows you to monitor results continuously without inflating your false positive rate. It is significantly harder to enable correctly after an experiment has already started.
Step 7: Validate Everything Before Going Live
Never assume the setup is working. Validate it.
Click through your product as a test user and check that the correct variant is being served. Verify in the Statsig console that your user appears with the correct variant assignment. Check that exposure events are firing at the right moment, not before the user sees the variant, not after the primary metric event. Confirm that your event properties are populating correctly by checking the event stream in the Statsig console.
Common issues to catch at this stage: exposure events firing before the variant renders, user ID not being passed correctly causing anonymous and identified profiles to split, events appearing in the wrong environment, and feature flags not being enabled in the production environment.
If any of these are present, fix them before you launch. The cost of clean data from day one is an hour of validation. The cost of discovering a data problem after two weeks of experiment runtime is two weeks of wasted results.
Get the full Statsig 101 Getting Started Guide
The Statsig 101 guide covers the complete setup process in detail: SDK selection, environment configuration, event instrumentation, identity resolution, feature flags, and experiment setup, with worked examples and a setup checklist you can follow step by step.
👉Download the free Statsig 101 Getting Started Guide
.png)
Want help getting Statsig set up correctly?
Getting the foundation right from day one saves weeks of debugging later. Book a free call and we will review your setup.
FAQ
How do I get started with Statsig?
Start by choosing the right SDK for your use case -- client-side for browser and mobile, server-side for backend logic. Configure separate API keys for development, staging, and production environments. Instrument your events with consistent naming conventions and correct property structure. Configure user identity correctly so anonymous and identified profiles merge correctly. Then create your first feature flag and experiment following the setup sequence above.
What SDK should I use for Statsig?
Choose based on where assignment needs to happen. Client-side SDKs evaluate on the user's device and are right for front-end feature changes and UI experiments. Server-side SDKs evaluate on the server and are right for backend logic, assignments that need to happen before the page renders, or any experiment involving data that should not be exposed to the client. Using the wrong SDK type is the most common source of subtle, hard-to-diagnose Statsig problems.
Do I need separate API keys for each environment in Statsig?
Yes. Using the same API key across development, staging, and production environments contaminates your production data with internal traffic and test events. Create separate keys for each environment in the Statsig console and configure your deployment pipeline to use the correct key in each context. This is one of the most common setup mistakes and one of the most damaging to data quality.
How do I set up experiments in Statsig?
Create a feature flag first with a default value of FALSE. Implement the gate check in your codebase. Instrument the events you want to use as metrics. Then create the experiment in the Statsig console -- add a documented hypothesis, configure your traffic split (start with 1/99 for validation), set your primary and guardrail metrics, and enable sequential testing before launching. Validate the setup with a test user before going live.
What is sequential testing in Statsig and should I enable it?
Sequential testing adjusts the statistical significance threshold dynamically as data accumulates, allowing you to monitor experiment results at any point without inflating your false positive rate. You should enable it for almost every experiment. It is significantly harder to enable correctly after an experiment has started -- always configure it before launch.
What are the most common Statsig setup mistakes?
The most common mistakes are using the wrong SDK type for the use case, not separating API keys across environments, inconsistent event naming across platforms, missing event properties, and misconfigured identity resolution that creates duplicate user profiles. Most of these are invisible until they affect experiment results -- validating the setup before launch catches all of them.